Building your database
Adding entries
Start to build your Bookpedia database by adding entries to the Library collection. There are several ways of adding entries but most of them require an internet connection:
Once the program has found a book, you can retrieve further information about it using the other search sites. For more information about that, take a look at the
advanced information section.
- Press the plus button in the toolbar or choose 'Add...' from the Book menu.
- Choose which site to search by clicking on the little magnifying glass in the search field. (If you choose 'All' the search will go through all the sites selected in the Bookpedia Preferences/Sites until it finds a match.)
- Enter the title of a book or keywords such as the name of an author or publisher and parts of the title.
- Depending on the search site you might also be able to choose a limiter (search by 'Title' only, for example), the type (book or comic) and a sort order for the results. These options will appear automatically at the bottom of the search when available.
- Press the 'Search' button to start the search.
Once the program has found a match for your search, the Add window will come up with the first result displayed. If it's a match, press the 'Add' button and the entry becomes part of your library.
If there is more than one result for your search you will see the number of results displayed at the bottom of the Add window. To see the titles of the next results, click the little arrow in the lower right-hand corner of the Add window to slide out a drawer. Click on the titles to see the results.
When you select "All" from the search site menu, the program will cycle through the selected sites until it finds a match for your search. In the Preferences > Sites, found under the Bookpedia menu, you can select the sites and drag them into the order you'd like the program to cycle through them.
- Choose 'Add...' from the Book menu or press the Add button on your toolbar.
- Click on the iSight button in the Search window.
- Position the bar code roughly inside the red square, at a distance where the barcode looks to be in focus.
- If there is a small additional bar code on the side, don't include that part in the scan.
- Once the iSight has read the bar code, the red square turns green, you'll hear a beep, the iSight window closes and the search for the entry starts automatically.
- If you have many books to scan in one sitting, set your Preferences to 'Return to search window automatically after add' and 'Add first search result automatically'. That way you can keep scanning and don't have to worry about pressing any buttons. (You will find these options in Preferences > General under the Bookpedia menu.)
Alternatively, use the 'Add Multiple...' feature found under the Book menu to bring up an 'Add Multiple' window.
- If you have a built-in iSight but would prefer to use an external camera for scanning, plug in your camera, hold down the Ctrl key and then press the 'iSight' button in the search window. This will bring up a dialogue where you can choose which camera to use for the future. If you want to change this setting at some point, hold down the Ctrl key and then press the 'iSight' button to bring up the dialogue again.
- Choose 'Add...' from the Book menu or press the Add button on your toolbar.
- Scan the barcode of the entry and it'll appear in the search window.
- If there is a small addition to the bar code on the side, do not include that part in the scan.
- Most scanners send an automatic return after the scan so the search will start automatically.
- If your scanner does not send an automatic return, hit the 'Search' button.
- Choose 'Add Multiple...' from the Book menu or press the Add Many button on your toolbar.
- Press the Bluetooth button in the multiple add window to pair your scanner with the program. (The pairing code for the Flic is 0000. For other scanners, please consult the scanner manual.) You only have to do this once. The program will remember the scanner in the future.
- Scan the barcode of the entry - it will appear in the table of the multiple add window and the search will start automatically. The search will use whatever site you have selected in the regular search window that comes up when you press the 'Add' button in the toolbar.
- If the search cannot find a UPC or EAN, a warning triangle will appear at the bottom of the multiple add window. Clicking that triangle will bring up a list of the UPCs that could not be found.
- Once your scanner is paired with the program you can also use the regular search window if you prefer.
If you have PocketpediaPocketpedia on your iPhone or iPad 2 then you can also use that as a scanner to get your barcodes into Bookpedia.
- Run Pocketpedia and tap the camera icon next to the Doghouse search field. (On the iPhone, tap the action/input button at the top of any collection and choose "Add" from the menu to bring up the Doghouse search field.)
- When the camera comes up, start scanning your barcodes.
- The color of the little computer icon at the bottom of the camera image lets you know whether you're searching Doghouse to add an entry to Pocketpedia directly (blue icon) or whether the UPCs are sent to Bookpedia for searches (green icon). Should Bookpedia not be running on your Mac or your devices are not connected to the same wireless network, the UPCs can be stored in Pocketpedia for future sending.
- The searches in Bookpedia will be done via the 'Add Multiple' feature so make sure you have the correct site selected in that window before your start the search.
- If Pocketpedia cannot find Bookpedia connected to the same wireless network, Pocketpedia will ask if you'd like to store the scans so you can store them to send to Bookpedia later. The number of scanned and stored barcodes will appear on top of the little computer icon on the camera image page. Once the two programs are connected to the same wireless network again, go back into the scanning feature in Pocketpedia and tap the little computer icon to send the scans to Bookpedia.
If you don't have an Internet connection, if Bookpedia can't connect to any of the search sites or if none of the sites have any information about the book, you can also add entries manually.
- From the Book menu choose 'Add...' or press the plus button on your toolbar.
- The regular search window will appear. Press the 'Add manually' button.
- This will bring up a blank window for you to fill in the information.
- Alternatively hold down the Option key and click on the plus button in the toolbar to bring up a manual add window.
You can still update information for an entry even though the information was added manually. All the information the program needs to conduct an advanced search is the title of the entry.
Adding multiple entries
If you have a scanner, a webcam or a list of UPCs/EANs or titles, use the "Add multiple" feature to add many titles in one go.
- Go into the Book menu and choose 'Add multiple...' or press the 'Add Many' button on the toolbar.
- Click on the magnifying glass to select a search site, enter a keyword or UPC/EAN into the search field and press the 'Add' button or Return-key to add it to the list.
- The search will start automatically in the background and you can keep entering UPCs and/or titles to add to the list.
- You can also use an iSight or a scanner to scan multiple UPCs into the list. Just press the iSight button in the multiple add window and scan an entry or if you're using a Bluetooth scanner, press the Bluetooth button to pair the scanner with the program. You'll hear a beep when the program has scanned the barcode and added it to the list.
- Any entries not found will be saved and added to a separate list. When this happens, a little yellow warning triangle appears at the bottom of the window. Click on it to see the list of entries that were not found.
If you already have a list of UPCs or titles, each separated by a return, then you can also copy paste that list into the search field and hit the 'Add' button. The list will appear in the window underneath the search field and the search will start automatically. Although the field is just one line in height, it will accept a paste of many lines as input.
Please note that when you are using the 'Add Multiples' feature, the entries will be added directly to your library and you will not be able to review them before adding since the 'add multiple' feature was designed with UPCs/EANs in mind.
Advanced searches - adding and/or updating info
To gather more information about an entry or to update information, use the little gear button in the Add/Edit window to choose the site you'd like to query for info. If there is more than one result returned, the drawer on the side of the window will pop out and present you with the choices. Select the correct title and the information will automatically be added to the entry. Please note that Bookpedia will never overwrite information already present so if you want to update a field, delete the data from it first and then use the gear button to query for more data.
You can also use the Update from... command found under the Book menu however this will download the first result found from the chosen website. In most cases that'll be the result you're looking for but for some books, especially those with a common title, it can happen that the wrong result is returned. That's why using the gear button is generally the safer option.
To do an advanced search for more than one entry at a time, select the entries in the list view and choose 'Update from >' under the Book menu. Choose the site you'd like to query and the program will download the information.
PLEASE NOTE: With this option the program will automatically add the first result returned. You will not be able to check whether this result is the correct one until after it has been added. (Especially if the title has many common words in it or it is part of a series, it can happen that the wrong result is added.)
Instead of choosing a site from the magnifying glass in the search window or the gear button in the Edit window, you can also use the keyboard shortcut Command-Control-[digit] to choose the site. The digit depends on the order of your sites in the Preferences > Sites.
For example, if your sites are ordered like this in the Preferences:
- Doghouse
- LoC
- AbeBooks
- ...
Then a search in Doghouse would correspond to the keyboard shortcut Command-Control-1, a search on the LoC would correspond to Command-Control-2, a search on AbeBooks would correspond to Command-Control-3, etc.
Cover images
When you add an entry through the internet, the cover art, if available, will be downloaded automatically.
Should there be no cover available or if you are adding an entry manually, either drag an image into the image well below the collections window or use the 'Download from...' command found in the contextual menu of the cover image well (Ctrl-click or right-click the image well to open the menu).
If you have an iSight or a firewire camera you can also use that to capture an image of the item. Use the 'Capture Cover...' command under the Book menu.
When you click on the cover image below the Collections column, it will appear in a separate, adjustable window which you can use to print the cover image.
To hide the cover image well, click on the cover image toggle button at the bottom left of the main window.
Ctrl-clicking (right-clicking) a cover image brings up a contextual menu which lets you copy the image, remove it or if there is no image present, download it. There's also an option to "Show in Finder" which will show you the original image file in the Finder.
Adding eBooks or PDFs
- Drag the file(s) over the Bookpedia icon in your Dock.
- Bookpedia will create a new collection called 'Imported eBooks' and add the file(s). As much information as possible will be extracted from the file(s), such as a cover image, title, author, etc. and a link back to the original file will be included as well.
To give you the opportunity to check that the import went correct, imported entries are put into a library-independent collection first. (Marked with a grey collection icon instead of a blue one.) To make the import part of your library:
- Select the imported collection.
- From the File menu, choose 'Include Collection in Library'.
- Delete the imported collection.
If you're just looking to link a PDF to an already existing entry in Bookpedia, take a look at the
linking section.
Searching Amazon for information
If you'd like to integrate with Amazon you have to sign in with your personal Amazon Web Services (AWS) secret and access key as well as your Associates ID in the Bookpedia Preferences > Sites tab. Here's how you get those keys and IDs:
To get your free AWS keys,
- Sign in to the AWS (Amazon Web Services) Console. If you already have an Amazon account that you use to purchase goods from their site you can use that same account. Otherwise sign up as a new user. (If you are signed up as a seller on Amazon, create a new account with a different email address.)
AWS provides many different services, including the free search that the Pedias let you access. This search feature is 100% FREE, regardless of how many searches a day you do, but since it is part of the greater AWS cloud and some of the other options are paid, Amazon may ask for credit card information as part of the sign up process.
- Once you are signed in, click on your account at the top right of the page and select "Security Credentials" from the drop down menu.
- On the next page, click on the "Access Keys" link to create your access key and secret key. IMPORTANT: Store these two keys somewhere safe because you will not be able to access the secret key again. If you loose it, you will have to create a new set of keys. More detailed information about these keys can be found on the Amazon Security blog.
- Amazon recommends that you create an IAM user that has access keys instead of creating an access key for the root user but unfortunately at this point the Amazon Associate API does not support IAM users so you have to create a root access key. If you're having trouble creating an access key, try using this direct link.
- Your keys will look something like this:
Access key ID: AKIAIOSFODNN7EXAMPLE
Secret access key: wJalrXUtnFEMI/K7MDENG/bPxRfiCYEXAMPLEKEY
Make sure you do not include any white spaces before or after the keys when you copy paste them to avoid any errors.
Then sign up for a free Associates ID at the
Amazon Affiliate Program. You will be asked to provide a website but this does not need to be a book selling site. A personal blog or even a friend's webpage, if they don't mind, will do. (This means the Amazon sales commission generated via the Amazon access will now go directly to you!*)
With your keys ready,
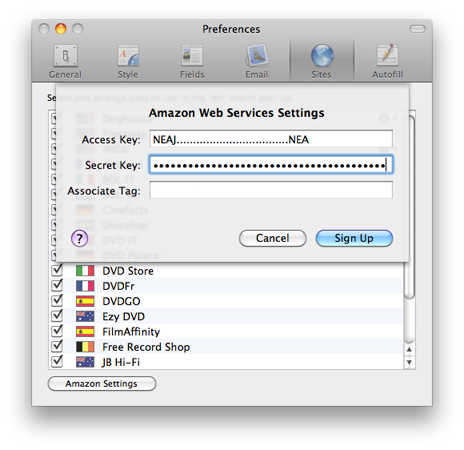
- Open the Bookpedia Preferences > Sites and click on the 'Amazon Settings' button.
- Copy paste your access key, secret access key and Amazon Associate ID (also called Tracking ID) into the appropriate fields.
- Press the Sign Up button.
The Amazon sites will now appear in your Sites window. Check the box next to those you'd like to use and drag them into the order you want the search to access them.
* Whenever you click on a link in the Pedias that takes you back to Amazon it has an ID attached to it. If you end up buying something on Amazon, the commission generated by that sale gets paid to the ID attached. This can happen through direct links in the program or if you export your database to the web and someone clicks on your link to Amazon. To generate referrals, click on the Amazon link in your Pedia program after adding an entry through the Amazon search.
If you have all three required IDs yet still get the error that "Your Access KeyID is not registered for Product Advertising API", please go back to the
Amazon Associates page and log in once with your username and password. After that return to the Amazon Settings window and you shouldn't have any further trouble.
z39.50 servers
z39.50 is an international standard defining a protocol for computer-to-computer information retrieval, mainly used by libraries and universities. You can add those servers to your Bookpedia search list through the 'z39.50 servers...' option found under the View menu.
To download information from a z39.50 server, you first have to add the institution to the Bookpedia search list.
- Choose 'z39.50 servers...' from the View menu.
- Click on the 'Possible Servers' link.
- The "z39.50 Target Directory" will open. Access it by clicking on the 'Find a target' link in the left-side menu.
- Once you have found the institution you want to add to Bookpedia, click back to Bookpedia and enter the information into the z39.50 window in Bookpedia.
The information you need to access a server is contained in these three fields:
Host,
Port and
Database Name.

Enter the information into the Bookpedia z39.50 window in this format: "server:port/database"
- Add the name of the server into the field 'Name' (this is for your own identification of the site in the search window later so you can assign whatever name you like).
- In the 'Server' field, enter the host information followed by a colon (:).
- After the colon, add the port number followed by a forward slash (/).
- After the forward slash, add the database name.
- Press the plus button to add the server to your list and OK to close the window.
- Now you'll be able to access the server from the Search drop down menu in the Search window.

Note: The default number of results returned is 50. If you'd like to change that, open the application "Terminal" found in Applications/Utilities and copy paste the following line into it, followed by a return (the number at the end is the number of results returned, i.e. in this case 20):
defaults write com.bruji.bookpedia NumberOfResultsYAC 20
The target directory site provided is one of the best we've found online so far, but there are many others available on the Internet, for example:
https://www.ukoln.ac.uk/distributed-systems/zdir/ (UK targets)
https://www.webclarity.info/registry/browse (international targets)
https://www.nla.gov.au/apps/libraries?action=ListTargets (Australian targets)
Unfortunately at this point Bookpedia cannot access servers that require a password or login.
